
Building an AirBnB Clone: The Console 1
The Foundations - Creating the Classes 🏗️


Introduction
The AirBnB project is a cornerstone of the ALX Software Engineering School curriculum, challenging students to construct a simplified version of the renowned AirBnB website and deploy it on their servers. Through this article, I aim to share the insights gained and lessons learned during the development process.
Project Phases
The project is composed of four (4) different phases to reach completion; of course, every website should have a frontend and a backend component.
Command Interpreter: Serving as the foundation, the command interpreter allows for data manipulation without a graphical interface, akin to a Shell environment. This phase is pivotal, providing developers with a platform for iterative development and debugging.
Website (Frontend): The face of the final product, the website showcases static and dynamic content to users, offering an experience tailored to their needs.
Data Storage: Whether through databases or files, this phase ensures the seamless storage and retrieval of crucial data objects, facilitating efficient information management.
API Development: Acting as the bridge between the frontend and data storage, the API enables communication and interaction, empowering users to retrieve, create, delete, and update data seamlessly.
Focus of this Article
This article focuses on the first big step: creating a command interpreter. We're breaking it down into two parts to really dig into how to make a solid command line interface. This sets us up for the rest of the project.
Significance of the Command Interpreter (The Console)
The command interpreter is like the heart of our project. It's a crucial tool that helps us play around with data and make things happen. Getting it set up early on is key because it lets us test ideas quickly, tweak things as we go, and fix any issues smoothly. Plus, it really helps us grasp how everything in the project fits together, so we can make smart choices and tackle problems head-on.
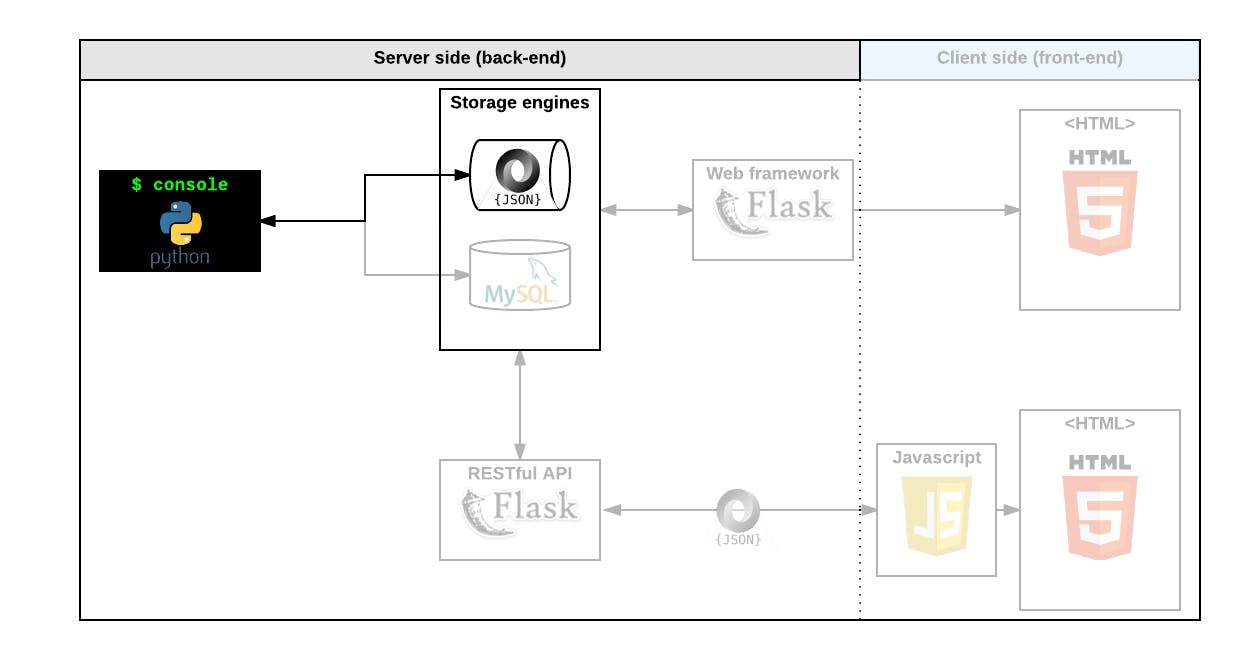
In our project architecture, we have two main components: the console and the storage engine. The console serves as a testing tool for us to experiment with and validate our storage engine, which in this initial phase is the file storage system.
Moreover, the first piece of our puzzle is manipulating a powerful storage system. This storage engine abstracts the complexities of data storage and persistence, providing a seamless interface between our objects and their underlying storage mechanisms. This abstraction shields our console code, as well as the frontend and RestAPI components we'll build later, from the intricacies of storage implementation.
This abstraction also allows us to easily switch between storage types without necessitating extensive updates to our codebase, enhancing the flexibility of our system. By validating our chosen storage engine through the console, we can thoroughly evaluate its performance, reliability, and compatibility, ensuring that it meets the requirements of our application and lays the groundwork for seamless integration with the frontend and RestAPI components.
Once everything is running smoothly with the file storage, we'll then be able to transition our models to build a database in MySQL. This database will be utilized by our web framework to serve responses for our client-side, or front-end, operations.
As developers, it's best practice to avoid writing code directly onto the production site. Instead, we test our code in a development mode before pushing it into production.
Building the Storage Engine (File storage)
To construct our storage engine, we'll start by organizing our code in a structured manner. We'll create a folder named "models" to store all the classes and models related to our storage functionality.
Creating the Models Folder
First, we'll navigate to our project directory and create a new folder called "models". This folder will serve as a container for all our model classes.
mkdir models
Setting Up the BaseModel Class:
Inside the "models" folder, we'll create two files: __init__.py and base_model.py. The __init__.py file signals to Python that the folder is a package, while the base_model.py file will contain our BaseModel class.
cd models
touch __init__.py base_model.py
Packages and Modules
In Python, a
.pyfile is called a module. When a module is found inside a folder (like our "models" folder), that folder becomes a package. Packages provide a way to organize and structure our code into logical units, making it easier to manage and maintain.Read more about python Packages and Modules HERE
By creating the "models" package and defining the BaseModel class inside the base_model.py module, we're establishing a modular and organized approach to building our storage engine. This separation of concerns allows us to develop and test our code more effectively, leading to a more robust and scalable solution.
Role of the BaseModel
Our BaseModel class serves as the bedrock upon which all other classes will be built. By creating this class, we're establishing an abstraction - a common blueprint that all other classes will inherit from. This abstraction helps streamline our code and ensures consistency across all models.
Read more about Object Oriented Programming HERE
This approach to object-oriented programming promotes code reuse and maintainability, enabling us to create a flexible and adaptable storage engine for our AirBnB console.
Now let's build our BaseModel Class 🔥
Building the BaseModel Class
To build out the class attributes and various methods we need to know what exactly we want. I created a list for that
We want our class instance to be always unique each time it's created.
We want to know the time it was created and updated.
In order to know when something is updated, we need to save it.
Finally, we need a way to print out these attributes of a single instance after it has been created.
From the above we would have to create the following attributes and methods
Attributes
id: This would be a string and would assign a unique id to the instance at its creation (a unique id for each BaseModel). To do this, we would use the uuid module.created_at: This would be a datetime object and would assign the instance with the current datetime when it's created.updated_at: Also a datetime object which would assign the instance with the current datetime when it's updated.
Methods
to_dict(self): Returns a dictionary containing all the key/values of the__dict__of the instance. Read about the__dict__HERE. The__dict__would only return the instance attributes as we have set. We want to do two things.We want to add an attribute
__class__who's value would be the name of the class (in this case BaseModel).Convert the datetime objects (created_at and updated_at) to their isoformat()
save: This would update the public instance attributeupdated_atwith the current datetime.__str__: This should simply print the instance like so[<class name>] (<self.id>) <self.__dict__>
Uuid Module
The UUID module in Python helps us create unique identifiers for objects. These identifiers are like fingerprints and ensure that each object has its own distinct identity. It's like giving every object in our program a special name tag so we can easily tell them apart.
Read more about the Uuid Module
Datetime Module
The datetime module helps us work with dates and times in Python. It lets us create, manipulate, and compare dates and times, making it easier to handle time-related tasks in our programs. Think of it as a handy tool that keeps track of when things happen in our code, like a digital clock for our program.
Here's the code for all that we have discussed so far
#!/usr/bin/python3
"""
Module for the Base Class
- Public instance attributes
    - id
    - created_at
    - updated_at
- Public instance methods
    - save(self) - updates the updated_at attribute
    - to_dict(self) - returns dictionary
- __str__ method to print
"""

import uuid
from datetime import datetime

class BaseModel:
    """
    This is the base model class
    It is an abstract class from which all other classes would inherit from
    """
    id = str(uuid.uuid4())
    created_at = datetime.now()
    updated_at = datetime.now()

    def __str__(self):
        """Returns a string representation of the object class"""
        return "[{}] ({}) {}".format(self.__class__.__name__,
                                     self.id, self.__dict__)

    def save(self):
        """
        Updates the public instance attribute update_at
        with the current datetime
        """
        self.updated_at = datetime.now()

    def to_dict(self):
        """
        Returns a dictionary containing key/value of __dict__ for an instance
        """
        obj_dict = self.__dict__.copy()

        obj_dict['__class__'] = self.__class__.__name__
        obj_dict['created_at'] = self.created_at.isoformat()
        obj_dict['updated_at'] = self.updated_at.isoformat()

        return obj_dict
As best practice, we would want to test our code with the following file. Let's name it test1.py. It would have the following code
#!/usr/bin/python3
from models.base_model import BaseModel

my_model = BaseModel()
my_model.name = "My First Model"
my_model.my_number = 89
print(my_model)
my_model.save()
print(my_model)
my_model_json = my_model.to_dict()
print(my_model_json)
print("JSON of my_model:")
for key in my_model_json.keys():
    print("\t{}: ({}) - {}".format(key, type(my_model_json[key]), my_model_json[key]))
Now let's make it executable chmod +x test1.py and then run it with ./test1.py . We should get the following.
[BaseModel] (b6a6e15c-c67d-4312-9a75-9d084935e579) {'my_number': 89, 'name': 'My First Model', 'updated_at': datetime.datetime(2017, 9, 28, 21, 5, 54, 119434), 'id': 'b6a6e15c-c67d-4312-9a75-9d084935e579', 'created_at': datetime.datetime(2017, 9, 28, 21, 5, 54, 119427)}
[BaseModel] (b6a6e15c-c67d-4312-9a75-9d084935e579) {'my_number': 89, 'name': 'My First Model', 'updated_at': datetime.datetime(2017, 9, 28, 21, 5, 54, 119572), 'id': 'b6a6e15c-c67d-4312-9a75-9d084935e579', 'created_at': datetime.datetime(2017, 9, 28, 21, 5, 54, 119427)}
{'my_number': 89, 'name': 'My First Model', '__class__': 'BaseModel', 'updated_at': '2017-09-28T21:05:54.119572', 'id': 'b6a6e15c-c67d-4312-9a75-9d084935e579', 'created_at': '2017-09-28T21:05:54.119427'}
JSON of my_model:
    my_number: (<class 'int'>) - 89
    name: (<class 'str'>) - My First Model
    __class__: (<class 'str'>) - BaseModel
    updated_at: (<class 'str'>) - 2017-09-28T21:05:54.119572
    id: (<class 'str'>) - b6a6e15c-c67d-4312-9a75-9d084935e579
    created_at: (<class 'str'>) - 2017-09-28T21:05:54.119427
NOTE: Your id's and datetimes may be different from mine but it's still correct as long as they have been represented this way.
Analysis of the Code
From the code above, anytime we save the instance, it's updated_at changes to reflect that we might have made changes to the instance. Also when we convert the entire instance into a dictionary using the (to_dict method) and print (the __str__ method enables that functionality), we get a very nice output of the entire instance in a key/value format just like JSON, however, take note that this is still a dictionary representation.
Why the to_dict() method ?
The to_dict() method helps us turn our object's information into a dictionary format. This is handy when we want to save our object's details in a file. It's like organizing our object's data neatly into a list, making it easy to save and retrieve later. This method makes it straightforward to store our object's data in files, exactly how we want it.
Creating Instances from Dictionaries:
Consider the versatility of the to_dict() method—it not only helps store data but also enables creating new instances from dictionaries. With this, we can make a BaseModel object and fill its attributes from a dictionary directly. This approach gives us flexibility in how we create and customize our objects, making our application more adaptable.
This is how the flow would be like
<class 'BaseModel'> -> to_dict() -> <class 'dict'> -> <class 'BaseModel'>
We would update our BaseModel class such that, when it is initialized with a dictionary (key/value pair object), we would have a way of creating that instance, otherwise, we go by our already modeled instance attributes. We would achieve this by using the concept of args and kwargs.
\Args and \*Kwargs
Args and Kwargs allow functions to accept variable number of arguments which are passed as a tuple.
The difference is that Args allow functions to accept positional arguments, while Kwargs allow functions to accept keyword arguments.
Our BaseModel would be updated with the following code. I have added the __init__ function to it.
def __init__(self, *args, **kwargs):
        """
        Initialiazes new instance of BaseModel.

        Args:
            *args: Unused positional arguments
            **kwargs: Dictionary representation of an instance.

        If kwargs is not empty:
            Each key has an attribute name
            Each value is the value of the corresponding attr name
            Convert datetime to datetime objects

        Otherwise:
            Create id and created_at values as initially done
        """
        if kwargs:
            if '__class__' in kwargs:
                # Remove '__class__' from the dictionary
                del kwargs['__class__']
            if 'created_at' in kwargs:
                kwargs['created_at'] = datetime.strptime(
                        kwargs['created_at'], '%Y-%m-%dT%H:%M:%S.%f')
            if 'updated_at' in kwargs:
                kwargs['updated_at'] = datetime.strptime(
                        kwargs['updated_at'], '%Y-%m-%dT%H:%M:%S.%f')

            for key, value in kwargs.items():
                setattr(self, key, value)

        else:
            self.id = str(uuid.uuid4())
            self.created_at = datetime.now()
            self.updated_at = datetime.now()
Analysis of the code
Since we want to pass a dictionary to the
BaseModelonce it's created, we would use**kwargs.We check for the various
keysof the dictionary and convert them appropriately.We remove the class key, so that the
to_dict()method would find the class, after which we loop through the entire dictionary and add them as attributes to the class.If nothing was passed as argument, we go ahead and instantiate the class as we previously did.
In our test1.py file let's add the following code to create another instance with the dictionary from the first instance.
# Add these lines of code
print()
print("Creating a new model from existing dictionary")
my_new_model = BaseModel(**my_model_json)
print(my_new_model.id)
print(my_new_model)
print(type(my_new_model.created_at))
Now observe the outputs of both instances. Finally add this line to the test file to check if both models are the same (you may be thinking yes)
print(my_model is my_new_model)

# Output
False
This shows that both models are totally different, despite the fact that we created one from the other.
This is our entire BaseModel class once again
#!/usr/bin/python3
"""
Module for the Base Class
- Public instance attributes
    - id
    - created_at
    - updated_at
- Public instance methods
    - save(self) - updates the updated_at attribute
    - to_dict(self) - returns dictionary
- __str__ method to print
"""

import uuid
from datetime import datetime

class BaseModel:
    """
    This is the base model class
    It is an abstract class from which all other classes would inherit from
    """

    def __init__(self, *args, **kwargs):
        """
        Initialiazes new instance of BaseModel.

        Args:
            *args: Unused positional arguments
            **kwargs: Dictionary representation of an instance.

        If kwargs is not empty:
            Each key has an attribute name
            Each value is the value of the corresponding attr name
            Convert datetime to datetime objects

        Otherwise:
            Create id and created_at values as initially done
        """
        if kwargs:
            if '__class__' in kwargs:
                # Remove '__class__' from the dictionary
                del kwargs['__class__']
            if 'created_at' in kwargs:
                kwargs['created_at'] = datetime.strptime(
                        kwargs['created_at'], '%Y-%m-%dT%H:%M:%S.%f')
            if 'updated_at' in kwargs:
                kwargs['updated_at'] = datetime.strptime(
                        kwargs['updated_at'], '%Y-%m-%dT%H:%M:%S.%f')

            for key, value in kwargs.items():
                setattr(self, key, value)

        else:
            self.id = str(uuid.uuid4())
            self.created_at = datetime.now()
            self.updated_at = datetime.now()

    def __str__(self):
        """Returns a string representation of the object class"""
        return "[{}] ({}) {}".format(self.__class__.__name__,
                                     self.id, self.__dict__)

    def save(self):
        """
        Updates the public instance attribute update_at
        with the current datetime
        """
        self.updated_at = datetime.now()

    def to_dict(self):
        """
        Returns a dictionary containing key/value of __dict__ for an instance
        """

        obj_dict = self.__dict__.copy()

        obj_dict['__class__'] = self.__class__.__name__
        obj_dict['created_at'] = self.created_at.isoformat()
        obj_dict['updated_at'] = self.updated_at.isoformat()

        return obj_dict
Adding More Classes
Now that we have our BaseModel class, we would create other classes as the functionality of our project demands. We would have different classes as follows Users, Places, State and City. These classes would handle various aspects of our data as their name implies.
We would create all these in our "models" folder like so
touch user.py place.py state.py review.py amenity.py city.py
Create the User Class
#!/usr/bin/python3
"""
- User class model which inherits from BaseModel
"""
from models.base_model import BaseModel


class User(BaseModel):
    """
    This is a user created with the BaseModel.
    It would have the following attributes
        - email: (str)
        - password: (str)
        - first_name: (str)
        - last_name: (str)
    """

    email = ""
    password = ""
    first_name = ""
    last_name = ""
Create the Places Class
#!/usr/bin/python3
"""
Module to handle the place class
"""
from models.base_model import BaseModel


class Place(BaseModel):
    """
    This handles the various places available
    - Attributes
        - city_id: (str) -> City.id
        - user_id: (str) -> User.id
        - name: (str)
        - description: (str)
        - number_rooms: (int)
        - number_bathrooms: (int)
        - max_guest: (int)
        - price_by_night: (int)
        - latitude: (float)
        - longitude: (float)
        - amenity_ids: (list) -> Amenity.id
    """

    city_id: str = ""
    user_id: str = ""
    name: str = ""
    description: str = ""
    number_rooms: int = 0
    number_bathrooms: int = 0
    max_guest: int = 0
    price_by_night: int = 0
    latitude: float = 0.0
    longitude: float = 0.0
    amenity_ids: list = []
Create the State Class
#!/usr/bin/python3
"""
Module for the State class
"""
from models.base_model import BaseModel


class State(BaseModel):
    """
    Class to manage the State
    - Attributes
        - name: (str)
    """

    name = ""
Create the City Class
#!/usr/bin/python3
"""
The module for the City class
"""
from models.base_model import BaseModel


class City(BaseModel):
    """
    A class to represent the various cities
    - Attributes
        - state_id: (str) -> State.id
        - name: (str)
    """

    state_id: str = ""
    name: str = ""
Conclusion
Ready to take the next step in building our AirBnB clone? Stay tuned for my next article, where I'll dive into building the File Storage system!
If you found this article helpful, show your support by leaving a like and sharing your thoughts in the comments below. Your feedback fuels our journey!
Follow me on GitHub, let's get interactive on Twitter and form great connections on LinkedIn 😊
Happy coding 🥂